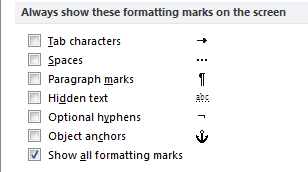
Non-printing characters (NPCs) show formatting in your document.
When you first see these symbols, you might think they’re cluttering up your screen.
In fact, they’re designed to be both easily perceptible when you want to see them and easy to ignore when you don’t. And the headaches they’ll save you when formatting documents will more than make up for any adjustment it takes to work with NPCs on all this time.
Here’s a partial selection of NPCs courtesy of Word’s Options dialog:
Importance of nonprinting characters
If you reduce the number of such characters you create, you both reduce the amount of formatting work you need to do later and make it easier to give your document a consistent look from beginning to end.
Of course, you need to use some manual formatting. For instance, every paragraph ends with the paragraph break you create when you press the Enter key. And to make chapters start on an odd page, you need to use a section break.
But to reduce your formatting time, you need to let Word handle more of the formatting, and that generally means reducing your use of NPCs.
You know you’re doing less manual formatting if you:
- only press the Return key once between paragraphs.
- never press the space bar twice
- rarely (if ever) use the Tab key
- rarely (if ever) insert page or section breaks
You can automate formatting like this using Word styles. In the coming weeks, I’ll post tips on how to achieve the habits in the list above.
Turn on nonprinting characters
If you don’t see nonprinting characters in your document, follow these steps.
- In either Word Options (Windows) or Preferences (Mac), go to the View tab.
- In the Nonprinting characters (or symbols) section, click the All box.
- Click OK.
You shoud now see NPCs in your document.
