Whether I work in my office or my girlfriend’s office, I connect my Mac to external monitors (two at my place, my girlfriend’s 27” iMac at hers).
The extra screen real estate means I spend less time flipping from one window to another. This saves time and keystrokes when, for instance, I copy information from a PDF and paste into notes for an article. It also means I can take notes during web-based courses entirely on one screen that’s larger than the 15” model on my MacBook Pro.
In fact, I work so much on larger screens that I make them the default monitor whenever I connect to them. This offers a few benefits, like seeing signon options on the screen I prefer to face. It’s a subtle change, but it makes working with an external monitor more pleasant.
The example below shows how I do this using my girlfriend’s iMac, but it’s the same with a Mac on any configuration of monitors.
Target Display Mode
Connecting a Mac to an external monitor is straightforward. There’s a little more (not much) to connecting a MacBook to an iMac. To use my girlfriend’s monitor:
- I plug a three-foot-long cable into her Mac and mine.
- With both machines powered on, I go to her iMac’s keyboard and press Cmd-F2.
- Then I wait up to ten seconds.
There’s nothing else to it. This feature, called Target Display Mode, is built into every Mac.
Bonus: Not only does my MacBook Pro show my work on the iMac’s screen, it also pipes sound through the iMac’s speakers.
I wish I could connect my girlfriend’s Windows laptop to the iMac, but I haven’t found a way to do this. If you have, please share your answer in the comments below.
Make an external monitor the main monitor
To make an external monitor the “main” monitor when it’s connected to my MacBook Pro, here’s what I do.
- From the Apple Menu, click System Preferences…
- In the System Preferences dialog, click Displays.
Note: Macs show one Displays dialog per screen connected to the Mac. In this example, I have two dialogs. I need to use the one pictured here, which has the Arrangement tab (the other Display preferences dialogs don’t). - In the Displays preferences, click the Arrangement tab.
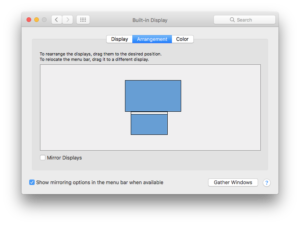
In this screen grab, the MacBook Pro monitor is represented by the lower blue rectangle and the iMac is the larger rectangle. You can move these around to change the alignment as you like.
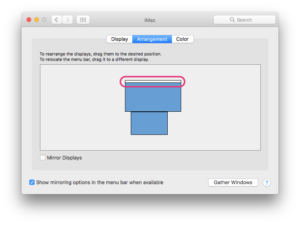
- Drag the small white menu bar at the top of the smaller (MacBook Pro) monitor and drop it onto the larger screen.
The dialog should look like this.

I’m sure there are ways to do this for computers running Windows, Chrome and Linux. If you’d like to share those instructions or reply to this post, please do so in the comments section below.